


Platform Engineering and DevSecOps teams are driven to move at a blistering pace. Managing multiple tools using different deployment approaches can slow these teams down. To help keep your Platform Engineering or DevSecOps teams working as high performers, Sonar supports deploying SonarQube Server in various ways. In other words, SonarQube Server can be deployed using the same tooling as your team’s other deployments. A common method to deploy is on a Kubernetes cluster using Terraform. This guide will walk through how to deploy SonarQube Server Enterprise on a Kubernetes cluster using Terraform. This setup facilitates the automated provisioning of a robust and scalable automated code review platform in a uniform manner as your other apps and services, ensuring secure, high-quality cloud-native applications.
Benefits of SonarQube
SonarQube is the leading platform for automated code reviews of code quality and code security. It provides comprehensive code analysis, enabling developers and security teams to detect vulnerabilities, bugs, and code smells across many programming languages. The key benefits of using SonarQube include:
- Comprehensive code analysis: Supports multiple languages and provides in-depth insights into security vulnerabilities, coding errors, and maintainability issues.
- Comply With Common Security Standards: Identifies security weaknesses based on PCI, OWASP, CWE, STIG, and CASA security standards and provides reports to help meet compliance.
- Code quality management: Enforce best coding practices, reduce technical debt, manage code test coverage, and improve software reliability over time.
Advantages of Kubernetes
Deploying SonarQube Server on Kubernetes enhances scalability, resilience, and manageability of the server, making it an ideal choice for enterprises. Kubernetes offers the following advantages:
- Scalability: Dynamic adjustment of resources based on demand, ensuring optimal performance.
- Resilience: Automated health checks and self-healing mechanisms to minimize downtime and ensure high availability.
- Container orchestration: Efficient management of containerized workloads alongside the automation of deployments, rollbacks, and updates.
Role of Terraform in Infrastructure as Code
Infrastructure as Code (IaC) is fundamental to maintaining a consistent and reproducible deployment environment. Terraform, a widely used IaC tool, automates the provisioning of cloud resources to help streamline infrastructure management. The advantages of using Terraform include:
- Automation: Reduces manual intervention by automating infrastructure setup and configuration.
- Consistency: Ensures that infrastructure is deployed in a standardized manner across environments.
- Reproducibility: Enables repeatable deployments, minimizing configuration drift and improving operational efficiency.
Prerequisites
To follow along with this guide, you will need the following:
- A SonarQube Enterprise Key.
- Kubernetes CLI and Helm installed.
- Familiarity with how to work with Kubernetes and Helm tools at the command line.
- An account with a cloud service provider, such as AWS, Azure, or GCP.
Terraform configuration
You can find the Terraform code used in this guide in the SonarQube Installations GitHub repo. There, you’ll find an example of a full SonarQube Server deployment to AWS EKS in terraform/create-eks/main.tf:
terraform {
  required_providers {
    aws = {
      source  = "hashicorp/aws"
    }
  }
}

provider "aws" {
  region = var.aws_region
  access_key = var.aws_access_key
  secret_key = var.aws_secret_key
}

# Create a VPC
module "vpc" {
  source  = "terraform-aws-modules/vpc/aws"
  version = "5.0.0"

  name                 = "eks-vpc"
  cidr                 = "10.0.0.0/16"
  enable_dns_hostnames = true
  enable_dns_support   = true

  azs             = ["us-west-1b", "us-west-1c"]
  public_subnets  = ["10.0.1.0/24", "10.0.2.0/24"]
  private_subnets = ["10.0.3.0/24", "10.0.4.0/24"]
  enable_nat_gateway = true
  map_public_ip_on_launch = true
}

# Create an EKS cluster
module "eks" {
  source          = "terraform-aws-modules/eks/aws"
  cluster_name    = "sonarqube-cluster"
  cluster_version = "1.31"
  subnet_ids      = module.vpc.private_subnets
  vpc_id          = module.vpc.vpc_id

  # To add the current caller identity as an administrator
  enable_cluster_creator_admin_permissions = true

  cluster_addons = {
    coredns = {
      most_recent = true
    }
    kube-proxy = {
      most_recent = true
    }
    vpc-cni = {
      most_recent = true
    }
    aws-ebs-csi-driver = {
      most_recent = true
    }
  }


  eks_managed_node_groups = {
    sonarqube_nodes = {
      desired_size = 2
      max_size     = 3
      min_size     = 1

      instance_types = ["m5.xlarge"]

      # Needed by the aws-ebs-csi-driver
      iam_role_additional_policies = {
        AmazonEBSCSIDriverPolicy = "arn:aws:iam::aws:policy/service-role/AmazonEBSCSIDriverPolicy"
      }
    }
  }

  cluster_endpoint_public_access  = true
  cluster_endpoint_private_access = true
  cluster_endpoint_public_access_cidrs = ["0.0.0.0/0"]

  tags = {
    Environment = "enterprise"
    Terraform   = "true"
  }
}
# Security Group for public access
resource "aws_security_group" "sonarqube_sg" {
vpc_id = module.vpc.vpc_id
ingress {
from_port = 80
to_port = 80
protocol = "tcp"
cidr_blocks = ["0.0.0.0/0"]
}
ingress {
from_port = 443
to_port = 443
protocol = "tcp"
cidr_blocks = ["0.0.0.0/0"]
}
egress {
from_port = 0
to_port = 0
protocol = "-1"
cidr_blocks = ["0.0.0.0/0"]
}
}
# Outputs for SonarQube Helm configuration
output "eks_cluster_name" {
value = module.eks.cluster_name
}
output "eks_cluster_endpoint" {
value = module.eks.cluster_endpoint
}Let’s walk through the IaC code, explaining the resources described in this file.
AWS provider configuration
provider "aws" {
  region     = var.aws_region
  access_key = var.aws_access_key
  secret_key = var.aws_secret_key
}
The provider section defines the AWS provider, using the given variables (var.aws_region, var.aws_access_key, and var.aws_secret_key) for authentication with your AWS account. These variables are defined in variables.tf and may require credentials (such as the AWS secrets) stored in a terraform.tfvars file. The AWS region is also dynamically set via var.aws_region.
AWS VPC Module
module "vpc" {
  source  = "terraform-aws-modules/vpc/aws"
  version = "5.0.0"

  name                 = "eks-vpc"
  cidr                 = "10.0.0.0/16"
  enable_dns_hostnames = true
  enable_dns_support   = true

  azs             = ["us-west-1b", "us-west-1c"]
  public_subnets  = ["10.0.1.0/24", "10.0.2.0/24"]
  private_subnets = ["10.0.3.0/24", "10.0.4.0/24"]
  enable_nat_gateway = true
  map_public_ip_on_launch = true
}
This code block uses the Terraform AWS VPC module to create a virtual private cloud (VPC) named "eks-vpc" with the CIDR block 10.0.0.0/16. It does the following:
- Enables DNS hostnames and DNS support for resources in the VPC.
- Defines two availability zones (
us-west-1b,us-west-1c). - Creates two public subnets (
10.0.1.0/24,10.0.2.0/24). - Creates two private subnets (
10.0.3.0/24,10.0.4.0/24). - Enables a NAT Gateway for private subnet internet access.
- Allows public instances to be assigned public IPs on launch.
AWS EKS cluster module
module "eks" {
  source          = "terraform-aws-modules/eks/aws"
  cluster_name    = "sonarqube-cluster"
  cluster_version = "1.31"
  subnet_ids      = module.vpc.private_subnets
  vpc_id          = module.vpc.vpc_id

  enable_cluster_creator_admin_permissions = true
This block uses the Terraform AWS EKS module to create an EKS cluster named sonarqube-cluster with Kubernetes version 1.31. The VPC ID and private subnets come from the VPC module above this section.
The line that follows, regarding admin permissions, grants administrative cluster access to the current IAM user, which will be the user that Terraform is running in AWS as. This significantly simplifies the Terraform needed; otherwise, additional roles or policies may be needed and specifically applied to users and resources.
Note: For production purposes, it is recommended to disable the enable_cluster_creator_admin_permissions line. Instead, you should set up special roles and policies for this deployment and management. Next, but still within the EKD module section, we have the following lines:
Next, but still within the EKD module section, we have the following lines:
cluster_addons = {
    coredns = {
      most_recent = true
    }
    kube-proxy = {
      most_recent = true
    }
    vpc-cni = {
      most_recent = true
    }
    aws-ebs-csi-driver = {
      most_recent = true
    }
  }
This enables the following EKS-managed add-ons:
coredns: Facilitates service discovery.kube-proxy: Maintains network rules.vpc-cni: Handles AWS VPC networking.aws-ebs-csi-driver: Manages EBS volumes for persistent storage. (Note: This is a crucial step and often missing from the documentation on setting up SonarQube on Kubernetes.)
Next, we have the following snippet:
 eks_managed_node_groups = {
    sonarqube_nodes = {
      desired_size = 2
      max_size     = 3
      min_size     = 1

      instance_types = ["m5.xlarge"]

      # Needed by the aws-ebs-csi-driver
      iam_role_additional_policies = {
        AmazonEBSCSIDriverPolicy = "arn:aws:iam::aws:policy/service-role/AmazonEBSCSIDriverPolicy"
      }
    }
  }
This creates a managed node group called sonarqube_nodes. It starts with two worker nodes but can scale between one and three. Each node will use an m5.xlarge instance. Adjust these instance types to meet your resource needs. However, if the node resources are too small, SonarQube will not install correctly and may not give useful feedback.
Lastly, the following section of code grants IAM permissions for the EBS CSI driver.
cluster_endpoint_public_access  = true
  cluster_endpoint_private_access = true
  cluster_endpoint_public_access_cidrs = ["0.0.0.0/0"]
This allows both public and private access to the Kubernetes API server. Public access is open to any IP address (0.0.0.0/0). This may pose a security risk, so adjust this accordingly based on your organizational needs.
Security group for public access
resource "aws_security_group" "sonarqube_sg" {
  vpc_id = module.vpc.vpc_id

  ingress {
    from_port   = 80
    to_port     = 80
    protocol    = "tcp"
    cidr_blocks = ["0.0.0.0/0"]
  }

  ingress {
    from_port   = 443
    to_port     = 443
    protocol    = "tcp"
    cidr_blocks = ["0.0.0.0/0"]
  }

  egress {
    from_port   = 0
    to_port     = 0
    protocol    = "-1"
    cidr_blocks = ["0.0.0.0/0"]
  }
}
This section creates an AWS security group (sonarqube_sg) that allows HTTP (port 80) and HTTPS (port 443) traffic from anywhere (0.0.0.0/0). This group matches the cluster endpoint access CIDR and allows all outbound traffic.
Deploying with Terraform
The following Terraform code, found at terraform/deploy-sonarqube/main.tf, installs SonarQube on an existing Kubernetes cluster:
terraform {
  required_providers {
    helm = {
      source  = "hashicorp/helm"
      version = ">= 2.0.0"
    }
    kubernetes = {
      source  = "hashicorp/kubernetes"
      version = ">= 2.0.0"
    }
  }
}

provider "kubernetes" {
  config_path = var.kube_config
}

provider "helm" {
  kubernetes {
    config_path = var.kube_config
  }
}

# Namespace for SonarQube
resource "kubernetes_namespace" "sonarqube" {
  metadata {
    name = "sonarqube"
  }
}

# Helm release for SonarQube
resource "helm_release" "sonarqube" {
  name       = "sonarqube"
  repository = "https://SonarSource.github.io/helm-chart-sonarqube"
  chart      = "sonarqube"
  namespace  = kubernetes_namespace.sonarqube.metadata[0].name

  values = [
    <<EOF
monitoringPasscode: "ChangeMe1234!"

edition: "enterprise"

service:
  type: ClusterIP

persistence:
  enabled: true
  storageClass: gp2

postgresql:
  postgresqlUsername: "sonarUser"
  postgresqlPassword: "sonarPass"
  postgresqlDatabase: "sonarDB"
  persistence:
    storageClass: gp2
EOF
  ]
}

# Output SonarQube service details
output "sonarqube_service" {
  value = helm_release.sonarqube.name
}
This Terraform configuration deploys SonarQube on a Kubernetes cluster using Helm. The key components of this configuration include:
- The
kubernetesandhelmproviders, which reference a Kubeconfig file (defined viavar.kube_config) to authenticate and interact with the Kubernetes cluster. - A Kubernetes namespace called
sonarqube, which helps isolate the SonarQube deployment.
Lastly, it creates resources for deploying SonarQube via Helm, using the official SonarQube Helm Chart from SonarSource:
- The Helm release name is
sonarqubeand is deployed in thesonarqubenamespace. - The
valuesblock configures key settings for SonarQube:- The monitoring password, which is a required property, is set to
ChangeMe1234!This should be updated for security. - The SonarQube Enterprise is enabled for this example.
- The service type is
ClusterIP, meaning SonarQube is only accessible inside the cluster. - Persistence is enabled, ensuring data is stored even if the pod restarts.
- The storage class is set to
gp2, which is specific to AWS.
- The monitoring password, which is a required property, is set to
- PostgreSQL configuration
- Uses an embedded PostgreSQL database configured within the Helm Chart.
- Provides database credentials (
sonarUser,sonarPass). - Enables database persistence with the
gp2storage class. This is a requirement for AWS EKS. - See the documentation on the official Helm Chart for setting up access to a remote database.
Deploying SonarQube on Kubernetes involves several key steps. Let’s walk through them one at a time.
Step 1: Provision the EKS cluster
Before deploying SonarQube, you need to provision an EKS cluster. Navigate to the folder with the Terraform module responsible for creating the EKS cluster (terraform/create-eks). Initialize the Terraform workspace and apply the configuration:
$ terraform init
$ terraform apply -auto-approve
This will provision an EKS cluster named sonarqube-cluster along with necessary networking and IAM resources.
Step 2: Configure kubectl for EKS
Once the cluster is up and running, configure your local kubectl to communicate with the new cluster:
$ aws eks update-kubeconfig \

    --region us-west-1 \

    --name sonarqube-cluster
Verify the connection by checking the cluster nodes:
$ kubectl get nodesYou should not see any nodes, but the above command will at least verify the EKS authentication is successful.
Step 3: Deploy SonarQube with Terraform
Next, deploy SonarQube using the separate Terraform module. Navigate to the SonarQube deployment Terraform folder (terraform/deploy-sonarqube). Apply the configurations here, just as you did above.
$ terraform init
$ terraform apply -auto-approve
This will install SonarQube onto the EKS cluster, creating the necessary Kubernetes deployments, services, and persistent storage configurations.
Step 4: Check deployment
Once Terraform completes, verify that SonarQube is running by listing the deployed pods:
$ kubectl get pods -n sonarqube

NAME                     READY   STATUS    RESTARTS   AGE
sonarqube-postgresql-0   1/1     Running   0          8m8s
sonarqube-sonarqube-0    1/1     Running   0          8m8s
This time, you should see pods in the command response. If both pods are ready (STATUS is Running), then the installation has completed successfully.
Step 5: Verification and validation
To access the running SonarQube application, forward the port from the cluster to your local machine with the following commands:
# Get the name of the pod that SonarQube is running on:
$ kubectl get pods \

    --namespace sonarqube \

    -l "app=sonarqube,release=sonarqube" \

    -o jsonpath="{.items[0].metadata.name}"

# Forward port 9000 from that pod to your local machine
$ kubectl port-forward <NAME OF POD> 9000:9000 -n sonarqube
Open a browser and navigate to http://localhost:9000. You should be greeted with the SonarQube login:

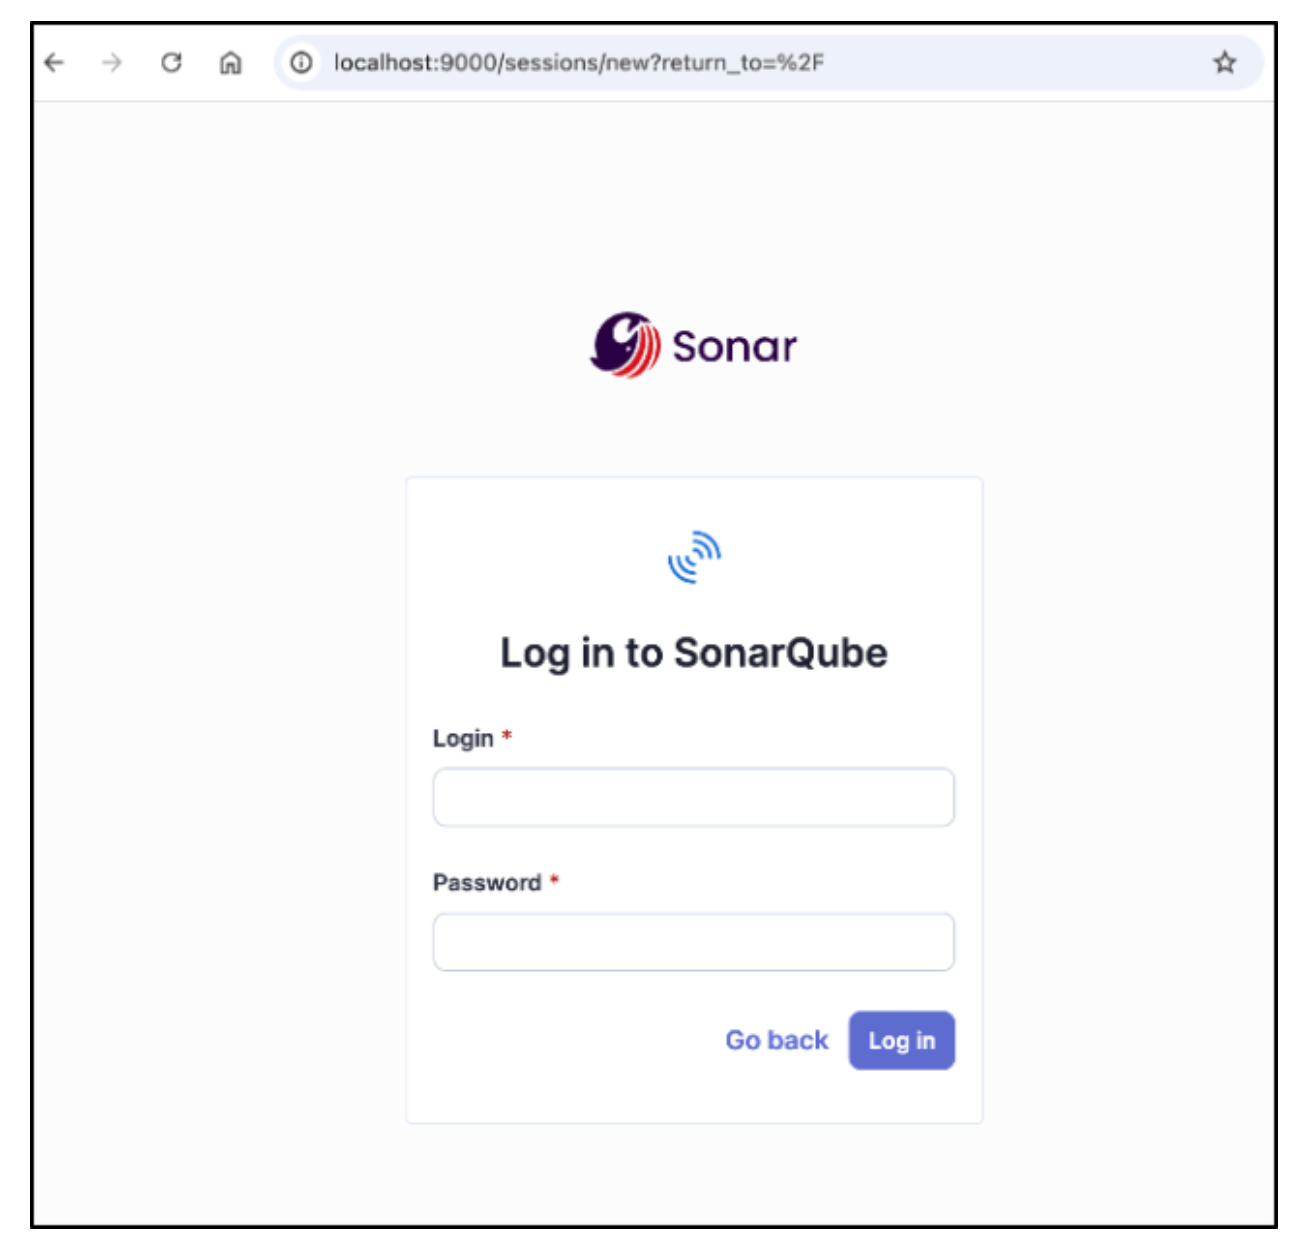
The default Administrator username is admin, and the password is admin. Upon first login, you will be asked to change this password.
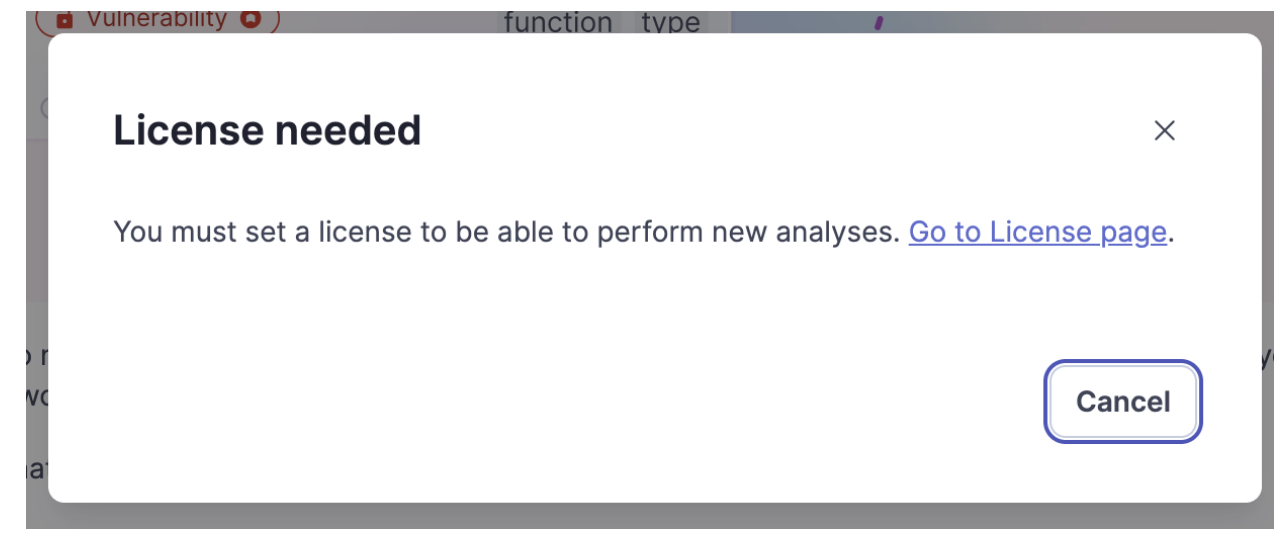
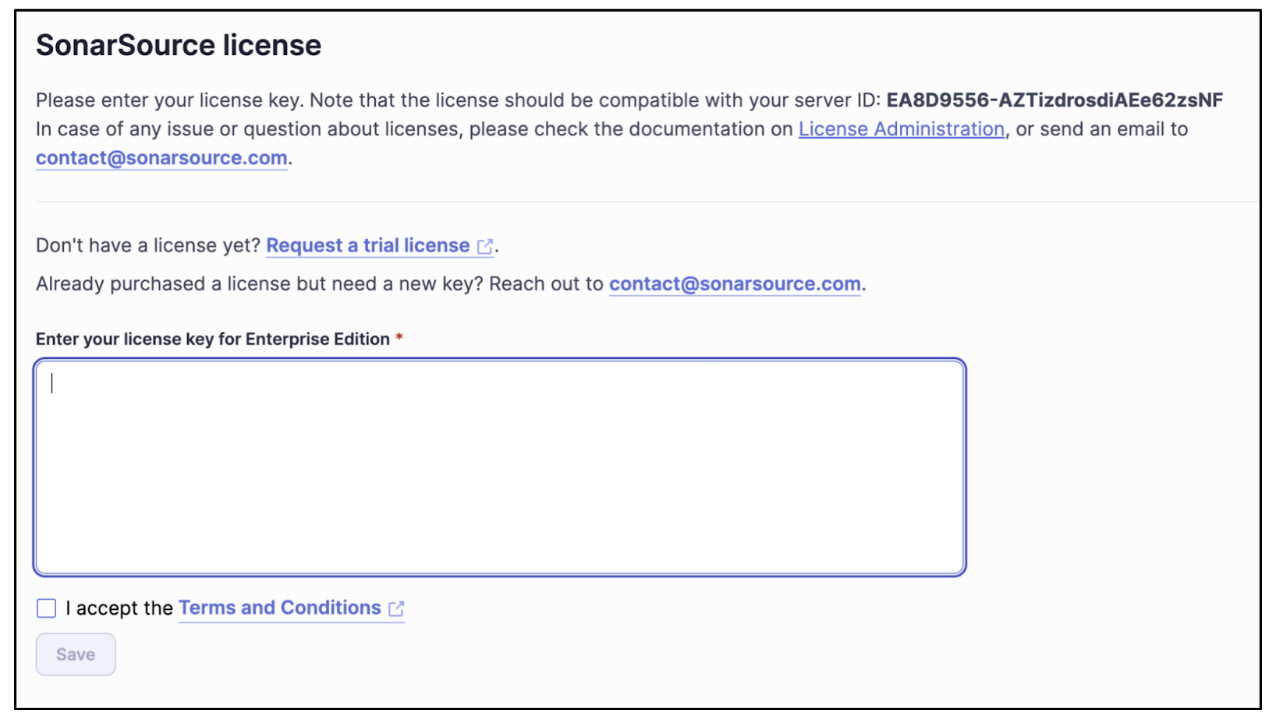
Then, you will be asked to set your Enterprise license key into SonarQube Server.

Note: Your license key is tied to your server ID, as shown below:

Scaling and maintenance with Terraform
Terraform simplifies the initial deployment of SonarQube Server on Kubernetes, and it provides a structured approach to scaling, upgrading, and maintaining the deployment over time. By leveraging Terraform to host SonarQube Server, you can ensure consistency and automate tedious tasks.
Scaling SonarQube Server resources
Scaling SonarQube Server in Kubernetes involves adjusting resource allocations for performance optimization. With Terraform, you can modify the Helm Chart values to increase CPU, memory, and replica counts.
For example, in a high-traffic environment, scaling up SonarQube Server’s compute resources can enhance performance. To do this, modify the Terraform configuration for SonarQube Server to read in values from a separate file called values.yaml.
resource "helm_release" "sonarqube" {
  name       = "sonarqube"
  repository = "https://SonarSource.github.io/helm-chart-sonarqube"
  chart      = "sonarqube"
  namespace  = "sonarqube"

  values = [
    file("values.yaml") # Read values from a file instead of hardcoding
  ]
}
To scale the deployment, update values.yaml with the necessary resource requests and limits:
sonarqube:
  replicaCount: 3
  resources:
    requests:
      cpu: "2"
      memory: "4Gi"
    limits:
      cpu: "4"
      memory: "8Gi"
After making changes, apply them using terraform apply -auto-approve.
Updating the SonarQube Server version
Sonar releases SonarQube Server updates with new features every two months and patches as needed to fix critical bugs and security vulnerabilities. With Terraform, updates are seamless. Simply update the version value in the Terraform script. You can see the latest versions available in the SonarQube Docker Hub. Here’s an example:
resource "helm_release" "sonarqube" {
  name       = "sonarqube"
  repository = "https://SonarSource.github.io/helm-chart-sonarqube"
  chart      = "sonarqube"
  namespace  = "sonarqube"
  version    = "2025.4.2" # Update to the latest version
}
Running terraform apply will replace the existing deployment with the updated version while preserving persistent data if managed correctly. For production environments, test upgrades in a staging environment before applying them to production.
Managing the SonarQube Server lifecycle
Terraform helps manage the entire lifecycle of SonarQube Server, from deployment to decommissioning. By defining SonarQube Server as a resource in Terraform, you gain full control over its lifecycle, providing you with the following:
- Automated backups: Integrate Terraform with a cloud provider snapshot mechanism to ensure database backups before making significant changes.
- State management: To maintain team consistency, store Terraform state securely using remote backends (such as AWS S3 or GitLab).
- Destroying resources: If SonarQube Server is no longer needed, clean up resources safely with
terraform destroy -auto-approve.
Terraform best practices
By following best practices, you ensure the maintainability and security of your Terraform projects. Proper version control, modular code structures, and effective state management can streamline operations and prevent misconfigurations.
Use version control for configurations
Storing your Terraform configurations in a version control system like Git gives you a structured approach to managing infrastructure changes. By tracking modifications in a repository, teams can collaborate effectively, roll back to previous states if necessary, and enforce code reviews before applying updates.
When using version control, adopt the following best practices:
- Use Git branches for changes. Implement feature branches for updates and merge them through pull requests to ensure review before deployment.
- Tag stable releases. Use Git tags to mark stable infrastructure configurations that have been tested and verified.
- Maintain a
.gitignorefile. Prevent sensitive files such asterraform.tfstateor.terraformdirectories from being committed.
Modularize code for reusability
Using a modular structure for Terraform code improves maintainability and allows reuse across multiple environments. Instead of a monolithic Terraform script, break configurations into smaller, reusable modules.
For example, create a sonarqube module:
modules/
  ├── sonarqube/
  │   ├── main.tf
  │   ├── variables.tf
  │   ├── outputs.tf
Then, reference the module in the main configuration:
module "sonarqube" {
  source = "./modules/sonarqube"
  namespace = "sonarqube"
  replica_count = 2
}
Leverage Terraform state for managing deployments
Terraform uses a state file (terraform.tfstate) to track the current infrastructure configuration. Proper state management is crucial for consistency and avoiding drift between the declared and actual infrastructure.
Adopt the following best practices for Terraform state management:
- Use remote state storage. Store the state file in a backend (such as AWS S3, Azure Storage, or Terraform Cloud) to enable team collaboration.
- Enable state locking. Prevent concurrent state modifications by using locking mechanisms such as AWS DynamoDB with S3.
- Secure state files. The state file may contain sensitive information, so use encryption and restrict access.
Below is an example configuration for remote state storage in AWS:
terraform {
  backend "s3" {
    bucket         = "my-terraform-state"
    key            = "sonarqube/terraform.tfstate"
    region         = "us-east-1"
    dynamodb_table = "terraform-lock"
    encrypt        = true
  }
}
Conclusion
Deploying SonarQube Server on EKS using Terraform provides a scalable and declarative approach to managing your infrastructure. By leveraging Terraform, we streamlined the installation process and enabled efficient scaling, version upgrades, and lifecycle management. Best practices such as using version control for Terraform configurations, implementing modular code for reusability, and leveraging remote state storage further enhance reliability and collaboration.
With Terraform, managing SonarQube Server becomes a repeatable and controlled process, reducing manual intervention and ensuring consistency across deployments. By adopting this approach, teams can maintain a robust SonarQube Server setup on Kubernetes.